Easy Fresh Apple Dump Cake

apple-dump-cake-1Sometimes you just want something sweet. And easy. And good for you too! What, it’s not? It’s made with apples! Okay, so good for you might be stretching it a bit. But did I mention it was good? And easy? That makes it a win-win!
Dump cakes have been around for a long time, and there’s a reason for that. They’re simple. Really simple. But they don’t taste simple, they taste deliciously complicated. Which makes them a perfect dessert choice. Whether going to a pot luck, having friends over, treating the family, or sitting home alone on a Friday night with your fluffy socks, jammies, wine, movie or Netflix, and cats, this cake is a great choice!
apple-dump-cake-4
Fresh Apple Dump Cake ~
Ingredients:
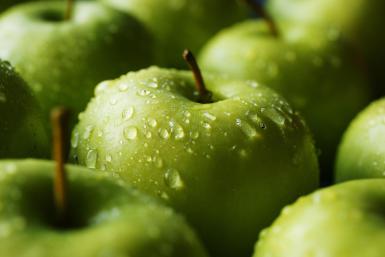
Apples (I use 4-5 Granny Smith and 1 Honeycrisp because I like a little bit of tart and sweet)*
 1 Cup (2 Sticks) Melted Butter
1 Yellow Cake Mix
1 Tbsp Cinnamon
apple-dump-cake-2
Instructions:
Preheat oven to 350
Layer your thinly sliced apples at the bottom of a 9×13 pan that has been coated with non-stick spray.
Whisk cake mix and cinnamon
Sprinkle cake mix and cinnamon over apples.
Pour 1 cup of melted butter over the top.
Bake at 350 for approximately 35-45 minutes — it’s done when it is nice and bubbly.


apple-dump-cake-3


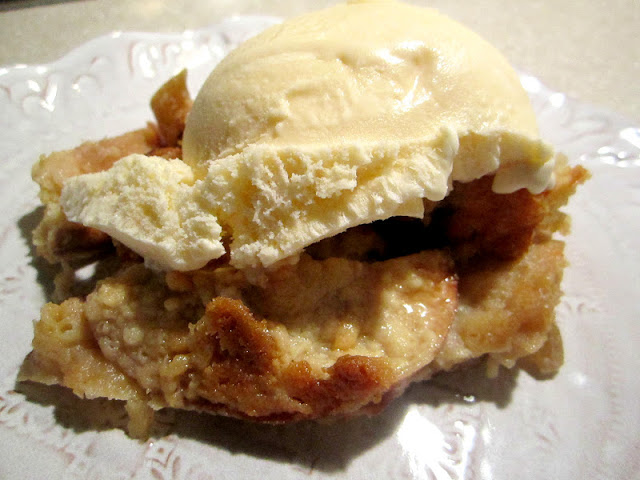
Serve warm with a generous scoop of ice cream, or, if you’re me, a VERY generous serving of whip cream, and enjoy!
*I like my apples sliced and peeled, though you could leave the peel on and dice them too.

Sweet n Salty Stovetop Popcorn

I love popcorn. I  really do. Always have. Well, except for air-popped. I just don’t like it that way. It’s too… bland. I mean, why have it if you don’t enjoy it? Isn’t that the purpose? And I know it isn’t particularly good for me (of course), but everything in moderation, right? So these days I don’t have it too often, but oh, once upon a time…

I Love Popcorn

Once upon a time, when I was young and single, footloose and fancy-free, careless and carefree, and before my metabolism betrayed me… Yeah, way back then… Things were different. I was different. I was poorer. Back then I had popcorn a lot. A lot. I would get home from a long, hard day of work, and popcorn was there waiting for me. And wine. Red wine. So that would be my dinner. Popcorn and red wine. Don’t judge me, it’s not like it was Ramen Noodles!

But times have changed, and I have changed, and though I still love popcorn (and have fond memories of my dinners of popcorn and red wine), I don’t eat it as much as I used to. I save those carbs for the wine (can’t have it all). Sigh. Sometimes I still get to enjoy it by myself. Other times, it’s with my family. I believe Charles M. Schulz put it quite nicely:

Love is Sharing Your Popcorn

One of the ways I’ve changed is how I make my popcorn. Back in the day, I would consume it by the bagful. Meaning, yes, it was microwave popcorn. Now though, I can barely tolerate that. Now when I make popcorn, it’s the old fashioned way ~ stove top. It’s so much better that way! And better for you too (not full of the dangerous chemicals that microwave popcorn is)!

So now I enjoy it, on occasion. Sometimes while watching a movie, sometimes while watching a political debate, sometimes while observing another’s drama… The point is, it’s okay to enjoy it! In moderation.

This recipe is so easy to make!

Sweet n Salty Popcorn

Ingredients:

  • ~ ¼ cup coconut oil (or canola)
  • ~ ⅔ cup popcorn kernels
  • ~ 3 Tablespoons butter, melted
  • ~ 2 Tablespoons honey
  • ~ 1½ teaspoons sea salt

Instructions:

  1. Add the coconut oil and 3 popcorn kernels to a large pot. (I use my Dutch oven.)
  2. Cover and cook over medium-high heat until all 3 kernels pop.
  3. Take the three kernels out of the pot.
  4. Add the rest of the popcorn kernels.
  5. Cover and take the pot off of the heat.
  6. Wait 30 seconds.
  7. Put the pot back on the heat. Cook, shaking the pot occasionally until the popping slows down.
  8. After about 2 minutes, and the popping has slowed down, take the lid off of the pot. This lets the steam out and keeps the popcorn crisp.
  9. While the popcorn is popping, melt the butter and add the honey.
  10. Pour over the popcorn and sprinkle with salt. Toss until completely coated. You could also do this in a large paper bag.

Note: If you don’t want the sweet, just eliminate the honey from the recipe. If you want more sweet, just add more honey. How simple is that?!

See? Easy-peasy! Now just grab a bowl, sit down, and enjoy!


Homemade Coffee Creamer

Homemade Coffee CreamerMmmmm… coffee! Go-go juice. Liquid energy, in a cup. Sanity saver. Whatever you call it, for many of us, coffee is an addiction a daily necessity. It wakes us up and keeps us going! While there are many who enjoy their coffee black, I simply do not. I have to have a generous amount of creamer.

I love the smooth, creamy, sweet taste of creamer. I love the many flavor options of creamer. What I don’t love about creamer is all the “stuff” that goes into making it ~ GMO’s, additives, preservatives, and artificial chemicals. YUCK!

Awhile back I discovered something ~ I can make my own creamer (thank you Pinterest)! With ingredients I typically already have at home. It’s easy (trust me on this ~ I’ve even made it in the morning, before having coffee, because I forgot to make it when I ran out). And better for you. And YUMMY! What else is there?

MFL Homemade Coffee Creamer 1

Homemade Coffee Creamer:

Ingredients:

~ 14 oz Sweetened Condensed Milk
~ 2 1/2 Cup Milk or Cream (whole, low-fat, skim, almond, soy, heavy cream, half & half, etc – whatever your preference, however the more fat, the more creaminess)
~ Whatever flavor combinations you prefer. I like 1 Tbsp Vanilla Extract.

Flavor Options:

Vanilla Extract, Chocolate Syrup, Cocoa Powder, Caramel Syrup, Almond Extract, Cinnamon, Coconut Oil, Maple Syrup, Pumpkin Puree, Pumpkin Spice, Honey, Orange Extract, Hazelnut Extract, Pink Himalayan Sea Salt,  Peppermint, or any other flavor Extract, Syrup, or Spice you like!

Hommade Coffee Creamer 2Instructions:

Add ingredients to a jar or mixing bowl, and stir or shake until well blended. I use a 4 Cup measuring cup. I first measure out the half n half (my preference), then add in the Sweetened Condensed Milk, and finally the ingredients. Mix well and pour into serving container. Mason jars work well, but so do recycled coffee creamer bottles!

Helpful Tips:

~ If adding dry or thick (honey) ingredients, first add it to a little cream and heat on the stove. Whisk continually until the ingredient dissolves completely. That way you won’t have clumpy or grainy creamer.

~ Add the expiration date of the milk or cream you use to the bottom of the jar or bottle, so you will always know what the expiration date is.

~ I’ve seen many recipes that call for Torani Syrup as an ingredient for creamers. They do have great flavors. They also use Sodium Benzoate as a preservative, which is a whole mess of bad news. For more info on that, go here.

Homemade Coffee Creamer 1

Crock Pot Ranch Chicken

Okay, so I made this new dish yesterday. And it was AMAZING! It’s a recipe that’s been making the rounds on the internet and has even achieved the coveted “viral” status. It’s Mississippi Chicken ~ have you heard of it? This is that recipe ~ only I changed the name.

See, I have an uber picky eater, and anything with “Ranch” in it, is far more palatable than anything with “Mississippi” in it. So this is my “soon to be famous,” child-approved Crock Pot Ranch Chicken. And yes, she LOVED it! Win-win for Ranch Chicken!

Doing my deep and arduous research for this recipe, I discovered there are two ways to make it and two ways to serve it. Some recipes called for boneless, skinless chicken breasts, while others opted for boneless, skinless chicken thighs. Since I’m a rebel, I used both!

As for serving, some recipes kept the chicken whole, plating it with fantastic sides. It works really well this way, as the chicken is both juicy and flavorful.

Ranch Chicken 1

Others went the extra mile and shredded it. When shredded, it is excellent over rice or mashed potatoes, on top of a salad, or wrapped in a tortilla. I decided to shred it and served it over rice, with steamed veggies.  I’m of the opinion that you should do whatever works for you!

Ranch Chicken 2

This recipe was easy-peasy and totally delish!

Ingredients:

  • 3 lbs boneless, skinless chicken breasts or thighs (or any combination of the two)
  • 1 stick butter (I didn’t say it was healthy!)
  • 1 packet dry ranch dressing mix (thus the new name)
  • 1 packet gravy mix (I used au jus)
  • 10 pepperoncinis (and just because I like to live on the wild side, I added 1 Tbsp of the pepperoncini juice from the jar)

Instructions:

  1. Place chicken in Crock Pot, and sprinkle dry ranch mix and gravy packet over the top.
  2. Slice butter into even-ish slices, and place on top of chicken.
  3. Toss pepperoncinis on top (and add a little juice if you like).
  4. Cover and cook on low 6-7 hours.
  5. If desired, shred chicken in the juices. Otherwise, serve the chicken with a little of the sauce drizzled on top.

As I said, it was well-liked and will be added to the preferred meals lineup! A word of caution ~ do not, I repeat… DO NOT withhold the pepperoncinis, it would completely change the flavor (if you don’t like them, just pull ’em out after it’s done cooking)!